Explore All
BROWSE BY CATEGORY
Interior
Exterior
Home Essentials
Homeowner Tools
Blogs & Guides
Find a Pro
Book Your Appointment Now
Home Essentials
About Renovize Home
Explore All
BROWSE BY CATEGORY
Interior
Exterior
Home Essentials
Homeowner Tools
Blogs & Guides
Find a Pro
Book Your Appointment Now
Home Essentials
About Renovize Home
Last Updated 2026-02-06
Knowing how to install a kitchen sink correctly is essential for preventing leaks, drainage issues, and long-term damage to cabinets or countertops. Kitchen sink installation involves more than placing the sink in an opening. It includes proper drain setup, faucet installation, plumbing connections, and secure sealing to support daily kitchen use.
A poorly installed sink can lead to water leaks under cabinets, slow drainage, and mold growth that often goes unnoticed. Even small alignment or sealing mistakes can cause damage over time, especially in areas exposed to constant water use. Installing the sink with the right measurements, connections, and materials helps avoid these problems.
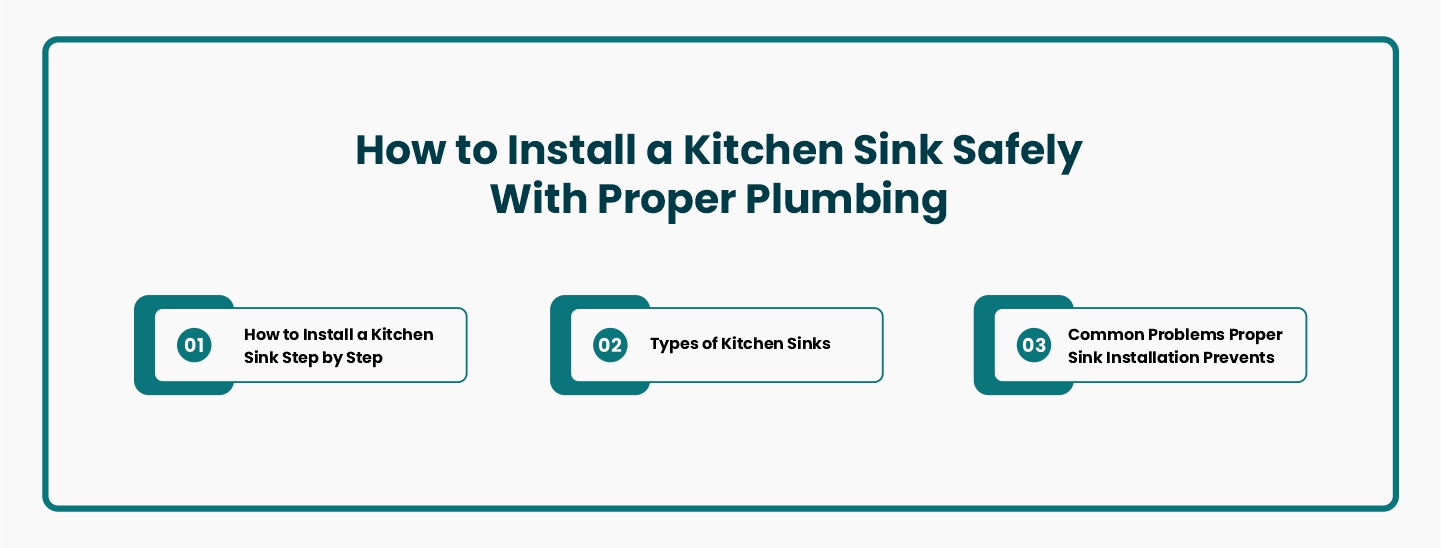
Table of Contents
How to Install a Kitchen Sink Step by Step
Types of Kitchen Sinks
Tools Required for Kitchen Sink Installation
Cost for Kitchen Sink Installation
Common Problems Proper Sink Installation Prevents
Final Thoughts
Installing a kitchen sink involves more than simply placing it into the countertop. A complete kitchen sink installation follows a step-by-step process that includes sink removal, surface preparation, accurate positioning, secure mounting, plumbing connections, and leak testing. Skipping or misordering steps can lead to drainage issues, leaks, cabinet damage, or premature sink failure.
Following the correct installation sequence ensures the sink fits properly, drains efficiently, and remains watertight during everyday use.
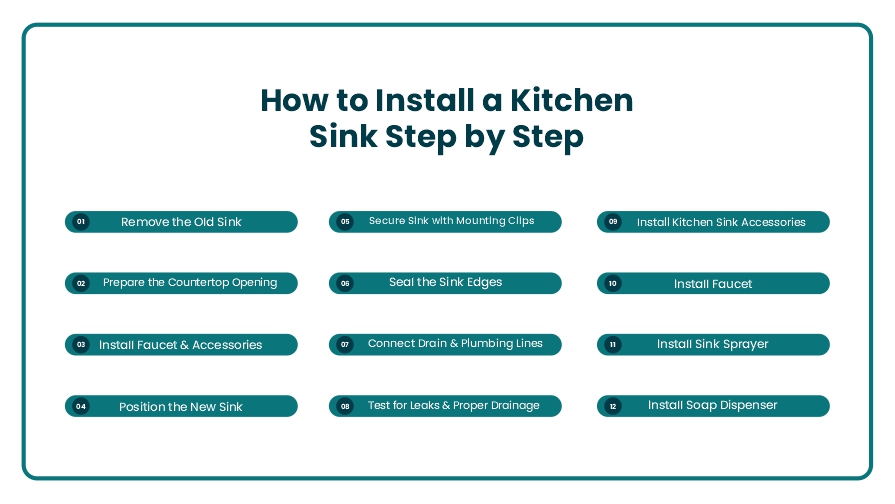
The installation process begins by turning off the hot and cold water supply valves beneath the sink. The drain pipe, trap, and water supply lines are disconnected carefully. If a garbage disposal is installed, it is detached or supported to avoid strain on the plumbing.
Mounting clips or brackets holding the sink to the countertop are loosened, and old sealant is cut away. The sink is lifted out gently to prevent damage to the countertop, backsplash, or cabinet frame.
After the old sink is removed, the countertop cutout is cleaned thoroughly. Old silicone sealant, debris, and residue are removed to create a smooth surface. The opening is inspected for cracks, swelling, or uneven edges.
Measurements are checked to confirm the new sink matches the existing cutout. A clean, properly sized opening allows the sink to seat correctly and prevents gaps that could cause water leakage.
Before placing the sink into the countertop, the faucet, sprayer, and soap dispenser are often installed while access is easier. Mounting hardware is tightened securely, and supply lines are attached according to manufacturer instructions.
Installing these components beforehand reduces strain on connections and avoids working in tight spaces after the sink is mounted.
The new kitchen sink is placed into or beneath the countertop opening to confirm proper fit. The sink edges are aligned evenly with the counter, and a level is used to ensure the basin sits flat on all sides.
Proper positioning is critical for correct drainage and prevents water from pooling inside the sink or placing stress on the mounting points.
Once aligned, mounting clips or brackets are installed based on the sink type. These clips pull the sink tightly against the countertop surface to create a firm, stable hold.
Clips are tightened evenly to avoid cracking the sink or damaging the countertop. Proper mounting prevents movement, shifting, or separation during daily use.
A continuous bead of waterproof sealant is applied around the sink perimeter where it meets the countertop. This seal prevents water from seeping underneath the sink and protects the cabinet below from moisture damage.
Excess sealant is smoothed for a clean finish, and sufficient curing time is allowed before reconnecting plumbing or using the sink.
After the sink is secured and sealed, the drain assembly is installed. The strainer, tailpiece, and trap are aligned to ensure smooth water flow. Water supply lines are connected to the faucet, and all fittings are tightened securely.
If a garbage disposal is present, it is reinstalled and connected to the drain system according to specifications.
The final step is testing the kitchen sink installation. Water is turned on slowly while all connections are checked for leaks. The sink is filled and drained to confirm proper flow and drainage speed.
Any leaks or misalignments are corrected immediately before regular use. Proper testing ensures the sink operates safely and efficiently without causing hidden water damage.
Installing kitchen sink accessories, including faucets, sprayers, soap dispensers, and shut-off valves, is a crucial step before final plumbing tests. These fixtures are generally installed early in the process to ensure proper alignment and accessibility. This sequence prevents tight working conditions and helps avoid difficult maneuvering under the sink later on. For many installations, securing the faucet first, before fully mounting the sink, streamlines the process.
The kitchen sink faucet is a vital fixture in the installation process. Start by securing the faucet base into the designated hole on the sink or countertop. Once the faucet is in place, connect the hot and cold water supply lines beneath the sink.
It's important to tighten the faucet evenly to avoid movement during daily use. Double-check the alignment to ensure smooth handle operation and proper water flow. This step guarantees that the faucet functions efficiently and comfortably during use.
Next, the kitchen sink sprayer is installed, typically through a dedicated opening beside the faucet. Once the sprayer is placed in the hole, its hose is routed beneath the sink and securely connected to the faucet body.
Before securing the hose, ensure it moves smoothly to prevent kinks or restrictions during use. Proper installation of the sprayer ensures full functionality without obstruction, making cleaning tasks easier.
A soap dispenser adds convenience and functionality to your kitchen sink. Install the dispenser by inserting the dispenser body through the countertop or sink opening. Secure the dispenser pump beneath the sink to prevent wobbling or instability.
Make sure the dispenser is placed in a position that provides easy access while avoiding interference with the faucet or sprayer. This ensures a smooth user experience while using the sink.
Finally, shut-off valves are an essential addition to any kitchen sink setup. These valves are installed on the hot and cold water supply lines, allowing quick control over the water flow to the sink. Shut-off valves are especially useful for emergency repairs or routine maintenance.
Ensure the valves are properly tightened to prevent leaks. Correct installation prevents water damage and ensures easy access when the water supply needs to be cut off.
There are several types of kitchen sinks, each offering unique features that cater to different styles, functions, and installation preferences. Here are the most common kitchen sink types:
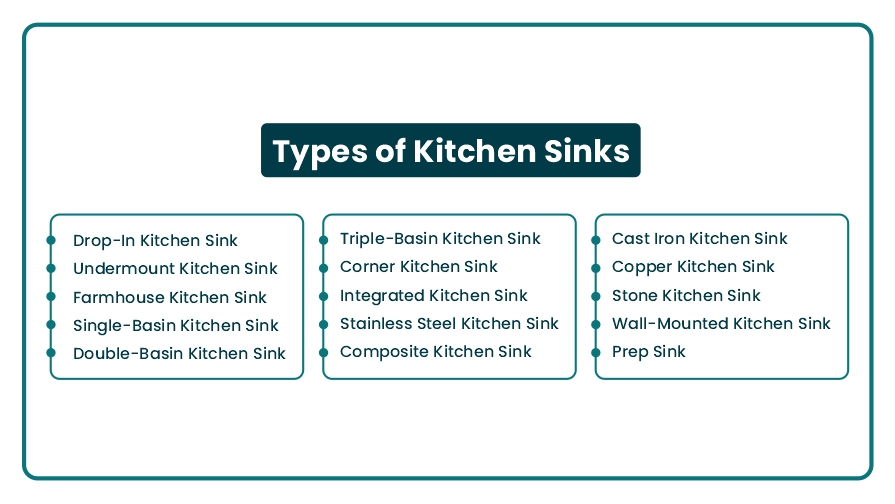
A drop-in sink is installed by dropping the sink into a pre-cut opening in the countertop. The sink sits on top of the countertop with a visible rim. It's easy to install and is a popular choice for DIY projects.
An undermount sink is installed beneath the countertop, offering a clean, seamless look. This type is ideal for modern kitchens, providing an elegant finish and making countertop cleaning easier as there is no rim to catch debris.
A farmhouse sink, also known as an apron sink, features a deep basin and a visible front panel. It is typically installed as a drop-in or undermount sink and is ideal for larger kitchens with a country or rustic design.
A single-basin sink features one large basin, making it ideal for washing large pots, pans, and dishes. It provides ample space and is often preferred in kitchens with limited counter space.
A double-basin sink has two separate basins, allowing for multitasking. One side is usually for washing dishes, and the other is for rinsing or draining. It’s great for households that need to separate tasks like washing and food preparation.
A triple-basin sink is similar to a double-basin sink but offers a third compartment, often used for additional tasks like food prep, washing, or soaking dishes. It’s a more specialized option, typically seen in commercial kitchens.
A corner sink is installed at the intersection of two walls, making it perfect for kitchens with limited space. It often features a L-shaped or triangular design to maximize corner areas.
An integrated sink is made from the same material as the countertop, creating a seamless design with no visible edges or seams. It's common in quartz and solid surface countertops and gives a modern, minimalist look.
A stainless steel sink is known for its durability, easy maintenance, and resistance to stains and rust. It is commonly available in drop-in, undermount, and apron styles. It's a popular choice for both modern and traditional kitchens.
A composite sink is made from a combination of materials, such as granite and acrylic. These sinks are durable, resistant to scratching, and often come in a variety of colors and textures. They can be either drop-in or undermount.
A cast iron sink is coated with porcelain enamel and offers a durable, glossy finish. Known for its long-lasting performance, it is typically installed as a drop-in sink. It's resistant to stains but can chip if hit hard.
A copper sink brings a rich, unique look to any kitchen with its natural warmth and patina. It's durable and antimicrobial, making it ideal for high-traffic kitchens. Copper sinks are typically undermount or drop-in.
A stone sink, made from materials like marble, granite, or soapstone, adds luxury and elegance to the kitchen. These sinks are heavy, durable, and often require professional installation due to their weight.
A wall-mounted sink is installed directly on the wall, offering a minimalist look. It saves counter space and is often seen in smaller kitchens or industrial-style spaces.
A prep sink is a small, usually single-basin sink designed for food preparation. It’s often installed near a kitchen island or prep area, giving extra convenience for tasks like rinsing vegetables or washing small items.
Using the correct tools and materials makes kitchen sink installation safer, faster, and more accurate. The right setup reduces alignment errors, prevents leaks, and ensures all connections remain secure during daily use. Many kitchen sink installation kits include essential components, but additional tools are often required.
| Category | Tool/Material | Description |
|---|---|---|
| Kitchen Sink Installation Tools | Adjustable Wrench | Used to tighten or loosen plumbing connections, especially on supply lines. |
| Kitchen Sink Installation Tools | Basin Wrench | Designed to reach and turn faucet nuts in tight spaces under the sink. |
| Kitchen Sink Installation Tools | Screwdriver | For securing mounting screws and adjusting clips. |
| Kitchen Sink Installation Tools | Utility Knife | Used for cutting sealants, silicones, or plumber’s putty. |
| Kitchen Sink Installation Tools | Measuring Tape | For accurate measurements of sink and countertop cutouts. |
| Kitchen Sink Installation Tools | Level | Ensures the sink is installed level for proper drainage. |
| Plumbing Connection Parts | Drain Pipes | Connects the sink drain to the home’s plumbing system. |
| Plumbing Connection Parts | Tailpieces | Short pipe sections that connect the sink to the drain pipe. |
| Plumbing Connection Parts | P-Traps | U-shaped pipes that trap water to prevent sewer gases from entering the home. |
| Sink Installation Clips/Brackets | Sink Clips | Secures plumbing connections and ensures leak-proof seal. |
| Sink Installation Clips/Brackets | Washers | Used to create a tight seal around connections and prevent leaks. |
| Sink Installation Clips/Brackets | Supply Lines | Flexible hoses that connect the faucet to the home’s water supply. |
| Sealing and Fastening Materials | Silicone Sealant | Applied around the sink edges and drain openings to prevent water leakage. |
| Sealing and Fastening Materials | Plumber’s Putty | Used under sink rims and faucets to create a watertight seal. |
| Sealing and Fastening Materials | Fasteners | Used to secure the sink to the countertop and other components. |
The total cost for installing a kitchen sink varies based on factors like sink type, materials, labor rates, and additional features such as garbage disposals or water filtration systems. Below is a detailed cost breakdown:
| Item | Estimated Cost | Description |
|---|---|---|
| Sink Purchase | $100 - $1,500 | Cost of the kitchen sink itself, varying by material (stainless steel, granite, etc.), brand, and size. |
| Faucet | $20 - $300 | Price of the faucet, depending on style, material, and features (e.g., sprayers, garden functions). |
| Garbage Disposal (Optional) | $150 - $500 | Optional garbage disposal unit installation. Prices vary based on brand and features. |
| Plumbing Materials (Pipes, Fittings) | $150 - $500 | Includes drain pipes, tailpieces, P-traps, zip ties, washers, and supply lines. |
| Sealants & Fasteners | $10 - $30 | Includes silicone sealant, plumber’s putty, and fasteners for securing the sink and faucet. |
| Sink Installation Clips/Brackets | $10 - $30 | Clips or brackets to secure the sink to the countertop. |
| Labor Cost (Plumber/Handyman) | $150 - $300 per hour (typically 2-4 hours) | Average labor costs for a professional plumber or handyman to install the sink, faucet, and accessories. |
| Disposal of Old Sink (Optional) | $20 - $50 | Removal and disposal of the old sink, if applicable. |
| Additional Features (e.g., Water Filtration, Side Sprayer) | $50 - $150 each | Cost for installing additional features like water filtration systems or side sprayers. |
| Option | Low-End Cost | High-End Cost | Description |
|---|---|---|---|
| Standard Installation | $400 | $1,500+ | Basic installation of sink, faucet, and plumbing connections. |
| Premium Installation (With Disposal & Accessories) | $500 | $2,000+ | Includes installation of garbage disposal, sprayers, and filtration systems. |
Correct kitchen sink installation helps prevent a range of common issues that often lead to repairs and water damage. Proper mounting, sealing, and plumbing connections protect both the sink and the surrounding cabinetry from long-term problems.
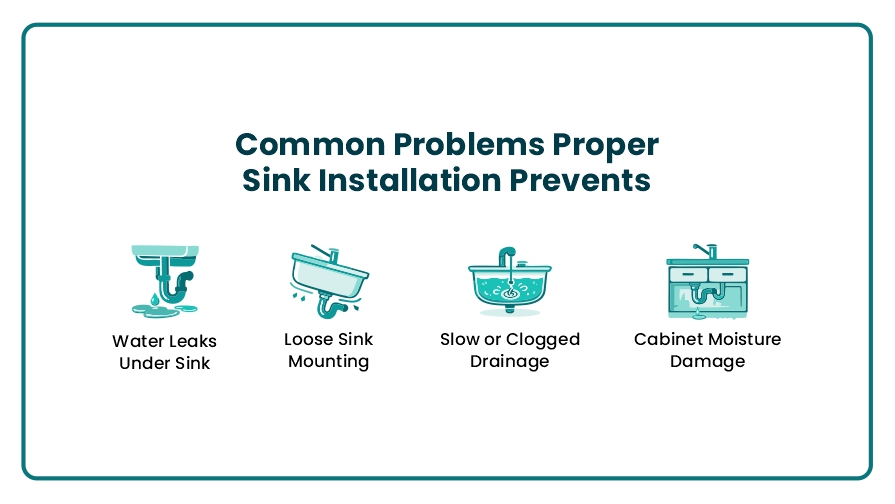
Poorly sealed drains or loose supply connections often cause leaks under the sink. Proper installation ensures all fittings are aligned and tightened correctly. This prevents hidden water buildup that can go unnoticed for months.
If a sink is not secured properly, it can shift or pull away from the countertop. Loose mounting weakens seals and increases the risk of leaks. Correct installation keeps the sink stable during daily use.
Incorrect pipe slope or misaligned drain connections can cause slow drainage or frequent clogs. Proper sink plumbing installation ensures water flows smoothly through the drain system. This reduces backups and standing water in the sink basin.
Leaks and condensation under the sink can damage cabinet floors and walls. Correct installation prevents moisture from reaching these areas. Protecting the cabinet structure helps avoid rot, mold, and costly repairs.
Installing a kitchen sink correctly is not just about appearance, it directly affects plumbing reliability, cabinet protection, and daily kitchen use. Proper sink installation prevents leaks, supports smooth drainage, and ensures fixtures stay secure over time. From choosing the right sink type to sealing and aligning plumbing connections, each step plays a role in long-term performance. Whether replacing an old sink or installing a new one, careful planning and correct installation help avoid costly water damage and repeated repairs.
Yes, a kitchen sink can be installed without replacing the countertop if the new sink matches the existing cutout size and mounting style. Drop-in sinks are the easiest to replace this way. Undermount replacements require precise fit and countertop compatibility.
It depends on the condition of your existing plumbing. If your current plumbing is in good shape and compatible with the new sink, you may not need to replace it. However, if there are issues like rust, corrosion, or incompatible fittings, it's best to replace or upgrade the plumbing to prevent leaks and ensure smooth operation of the new sink.
A drop-in sink is the easiest type to install in an existing kitchen. It simply drops into a pre-cut opening in the countertop, and the rim sits on top. This installation requires minimal modifications to the countertop, making it ideal for DIY projects or when replacing an old sink with the same type. Undermount sinks are more complicated as they require a professional installation and countertop modifications.
Once installed, test for leaks, proper drainage, and secure mounting. Run water through the sink and check the plumbing connections under the sink for any signs of leakage. Use a level to ensure the sink is properly aligned. Ensure the faucet functions properly, the drain flows without clogs, and there is no movement or instability in the sink. If any issues arise during this test, recheck the installation or consult a professional.
If your kitchen sink is not draining properly, it could be due to a misaligned drain pipe or trap, a clogged pipe, or improper slope. First, check that the drain pipes are correctly connected and that the trap is not blocked. If these are fine, check the angle of the drain pipe to ensure it slopes downward for proper drainage. If the problem persists, it may require a plumber to resolve any deeper plumbing issues.
Join our mailing list for exclusive updates, expert tips, and special offers tailored to your needs. Be the first to know about the latest in home services.

Renovize Home is a platform that supports homeowners from planning to renovation. Whether it’s Renovize AI for guidance or a one-on-one call with Pro Finder, we understand your project and match you with local contractors tailored to your needs.
Who We Are
About Renovize HomeGet in TouchHomeownwer Support:
Coming Soon!
General Inquiries:
support@renovizehome.com
Head Office:
24 Greenway Plaza, STE 1800M, Houston, TX 77046.